The objectives of this project include
1) to understand the complex relationships between types and images through the juxtaposition of type and image; and
2) to use this combination to express and to communicate. In this process students will further acquire skills in composition, typographic design, image manipulation, and creative problem solving.
Problem Statement
You will design four plates of size 7″x7″. Each plate incorporates one quotation and one image (except the “type only” plate). You shall use the same quotation and image for plates. Each plate, however, focuses on different elements or combinations of elements:
type only
type and image – type dominant
type and image – image dominant
type and image fusion – type and image merge into one entity
• Typography: Do not mix more than two typefaces on one plate unless it serves your design concept. The typeface should preferably be selected among the followings: Goudy, Garamond, Baskerville, Galliard, Bodoni, Century Expanded, Optima, Futura, Gill Sans, Univers, Helvetica, Helvetica Neuve, and Frutiger. If you can’t find a good font to fit your concept, you may explore different fonts. Get the instructor’s approval on your choice of typeface before proceeding to the next step. Don’t alter the typeface.
• Resolution: image resolution describes the detail an image holds. You can not increase the dpi of a low resolution image. Please start with higher resolution image, e.g., 7.25”x7.25” at 300 dpi.
• Bleed: Extra ink area that crosses the trim line, used to allow for variations that occur when the reproduction is trimmed or die-cut. Bleed usually requires adding 0.125″ to the image or any graphic on each side.
• Image: Use the same primary photographic image throughout the project.
Do not use your own illustration. You must have the Instructor’s approval of your image before working on sketches.
• Color: Four-color. Use color to enhance meaning and establish hierarchy.
• Software: Adobe InDesign.
—Photoshop maybe used for the fusion piece, then bring it into InDesign.
Formal qualities: 1. Optical effect: perspective, lens, or filter. 2. Shared surface or texture. 3. Motion or gesture. 4. Metaphor.
Process
You must follow the design process, show your progress at each class, and document your process and upload/pin all the materials (include the final designs) onto your project 1 Pinterest board.
Step 1 Choose your quotations and photos
Please find a quotation of three to seven words in length. Then find several existing photographic images that may express the meaning of the quotation.
Research and analyze (commenting each one) the existing design examples (minimum of 12 good examples — 3 for each required plate). Please organize them into four sub-categories (type only, image dominate, text dominate, and fusion).
Step 2 Sketch out ideas
Sketch out your ideas by hand on paper. A minimum of five sketches for each plate are required. Conduct a font study to help you select the appropriate typeface.
Step 3 Create roughs on computer
You shall select two ideas for each plate to implement them using Adobe InDesign.
Step 4 Refine your final designs and write a project report
Select one rough for each required design for further refinement. Save your design with cropping marks in pdf format. Make sure your design has been saved correctly before you send them to print. Print on quality white paper and trim out neatly.
Don’t wait until the last minute to print.
A one page, typed project report: summarizing the design concept, the process, and giving a critique of your final design.
Sort, organize, and assemble your Pinterest process board to ensure it is ready for grading with your mounted project.
Deliverables
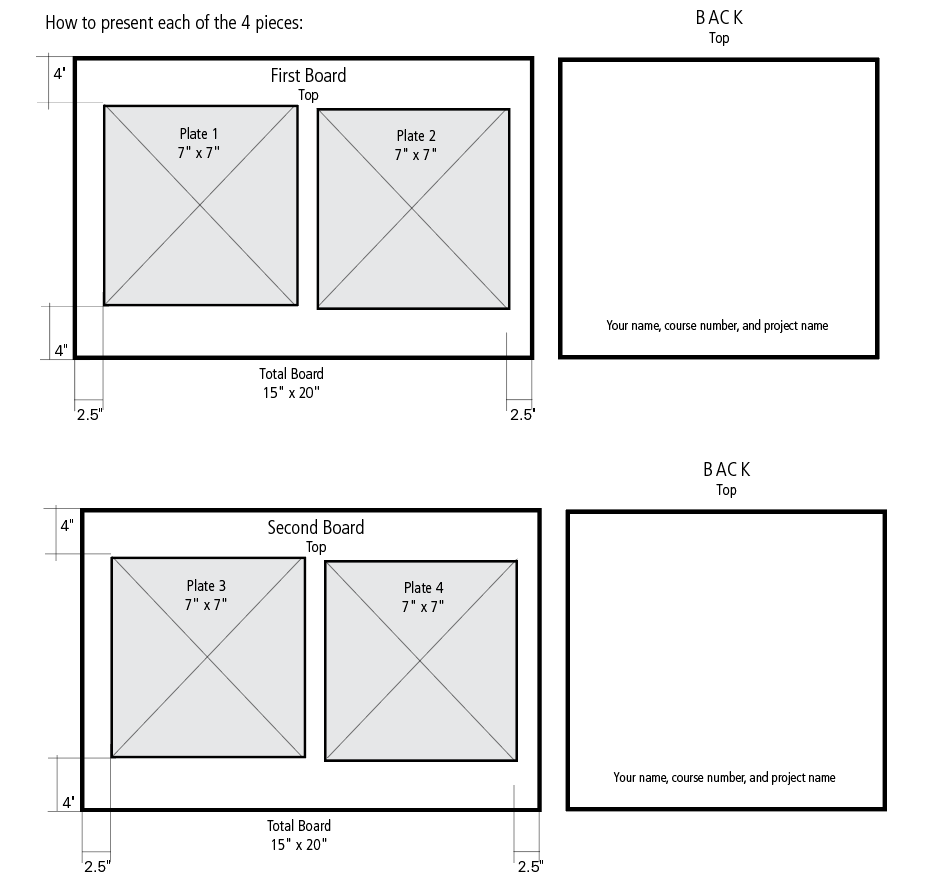
1. Total four plates: each of size 7″ x 7″ and a copy of your project final report
Mount four plates on two 15″x20″ black boards, two plates on each board. Write down your name, course number, and project name on the back of the mat board.
Don’t use foam board.
2. Process Pinterest board: include the project final report, found imagery, font study, research, sketches, roughs, revisions, final designs, and any other materials.
3. Digital file submission: you will submit a non-returnable digital portfolio on a flash drive or DVD of all final projects and assignments/exercises on the last day of class. Please back-up your four final designs in both pdf and low resolution (72 dpi at the size of 7″x7″) jpg formats. The portfolio counts as 5% toward your final grade.
Due: Thursday, Feb. 13th (at the beginning of the class)
Grading
Design process: 30 Points
-
Research: type, image, and meaning (do not research exclusively on the web) (5) Development of text and image: sketches (10), roughs, laser prints, etc. (10) Project report (5 points)
Execution of the four plates: (10 points per plate) 40 Points
-
Concept (creativity, uniqueness, clarity, effective communication, etc.)
Visual organization (hierarchy, focal point, etc.)
Choice and use of type and color; integration of type and image
Presentation/Craft: Process board & final designs: 30 Points
Total: 100 points
How to present each of your designs:

* Cover design by Randall Parrish
